I have not seen a photo of your complete tractor but in the pics I have seen the plow looks like a Holt style loop. No tree necessary, but a friend on the ground to give directions is a must- unless you want to climb-off, look, climb-up etc. a bunch. 1. Remove the trunnion caps then back the tractor up until the trunnion balls are clear. 2. Raise or lower the root plow until the plow arms will clear the trunnion balls and drive the tractor forward just enough to be free. 3. Place blocks as needed under the trunnion caps on the plow arms. 4. Remove the hydraulic cylinder from the root plow.
This is a real fun exercise, especially so if you don't have help. For even more fun, you can even wait until mid-afternoon and do this in the sun!:cool2:
Give me a call sometime cab.
Happy 'dozing,
Craig
Once chained a root rake to a tree and backed away from it. A few years later I sold the dozer that rake went on. The chain was covered by tree bark. I have an oak tree with a few feet of chain hanging out of it now. Wish I had the chain but don't want to part with the tree.:doh:
old 3t mate thats funny it must have been a fast growing tree or it sat for some years
Paul
old 3t mate thats funny it must have been a fast growing tree or it sat for some years
Paul
[quote="mrsmackpaul"]old 3t mate thats funny it must have been a fast growing tree or it sat for some years
Paul[/quote]Set there for 24 years....sure went by fast.
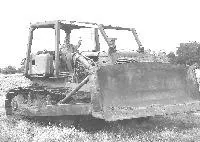
Here are pics showing trunnion latch and plow.
Hi Team,
In 'Nam we used to take the rippers off the D8H's by embedding the tines into the ground and then block under the main beam and arms, then remove the pins, etc. and drive away. We would then remove the mounting brackets from the rear face of the machine.
To refit was a reversal.
Hope this helps.
Cheers,
Eddie B.
That is definitely not a Holt root plow. I am not sure how the trunnions in these photos release. The first steps from my previous post are for Holt-style trunnions. The steps needed for the root plow in these pics are: 1. Place blocks under the wide part of the root plow pull arms (the rounded part just behind the trunnions) then remove the bolts to release the trunnions. 2. Use the root plow control to raise the root plow pull arms until they are free from the trunnions and add more blocks as necessary to support the root plow pull arms. 3. Pull the tractor forward while extending the root plow hydraulic rams until there is a safe clearance between the tractor and the root plow. 4. Support the root plow hydraulic cylinders as necessary and remove the mounting pins from the root plow hydraulic cylinders. 5. Consume a cold adult beverage in the shade, you earned it! 👍
Give me a call sometime cab.
Craig


Our channel highlights machines from the earliest Holt and Best track-type tractors, equipment from the start of Caterpillar in 1925, up to units built in the mid-1960s.
Chapter Two
| Highacres Farm, Dewey Lane, Brackenfield, Derbyshire DE55 6DB, UKChapter Nineteen
| 2 Winkleigh Rd, Exeter TAS 7275
Antique Caterpillar
Machinery Owners Club
1115 Madison St NE # 1117
Salem, OR 97301
Terms & Privacy
Website developed by
AdCo
"I also joined a year ago. had been on here a couple of times as a non-member and found the info very helpful so I got a one year subscription (not very expensive at all) to try it out. I really like all the resources on here so I just got a three year. I think its a very small price for what you can get out of this site."
-Jason N