Thanks fro the post im having some trouble with my vac tank on the snowcruiser 30 it keeps wanting to flood the engine this site may help! Jason
I had the problem on my Sixty and the float was not working it was an old cork style. I replaced it and it works OK now. Tim
Rick,
Thanks for the link and he looks a bit like Santa!
Hal is a great guy to talk to and very helpful! He does not have any kits for the 10 bolt Stewart vac tanks though. All of his kits are for the 6 or 8 bolt vac tanks which were used in automotive applications.
These vac tanks are fairly simple when looking at each operation/function of the vac tank seperatly. When you put all of the operations together it is easy to get frustrated chasing problems.
Jason 10/D4, flooding is what I was chasing on a sixty I have been working on. I found a couple different problems compounding together. First the vent valve was sticking slightly in its seat. I packed the valve and seat with brasso and spun the valve with my finger tips to polish the valve and seat. When done some brake clean and compressed air cleans the brasso out very easy. Secondly, the springs that work the toggle arm up and down...they cannot be too strong or too stiff. Reproduction springs are available. Third, check the geometry in all of the float and toggle linkages. Absolutley nothing can bind. Any binding takes away floatation efforts of the float. Check the location of the springs in relation to the pivot point of the toggle arm right before it snaps up. Those springs should be really close, but ever so slightly below the pivot point of the toggle arm. If its too low, this means that an arm or something is bent and it will take more flotation efforts of the float to snap the toggle in its up position. Last but not least the float, it has to have enough displacement to create the upward force needed to work the toggle arm and valves. If the float is original and made of cork any signs of shrinkage or deterioration effects the floats displacement. I had to make my own float.
Here are the basic operations in the vac tank.
Float down (snapped down): Vacuum valve is open allowing the vac tank to be under vacuum bringing fuel in from the gas tank. In this same position the vent valve is closed and needs to be closed to keep the tank in a state of vacuum.
Float up (snapped up): Vacuum valve is closed shutting off vacuum from the engine. In this same position the vent valve is open. With this vent valve open it allows fuel from the inner tank to drop through the flapper in the bottom to the outer tank as it is being consumed by the engine.
I hope this helps everyone.
Thanks Chad for the info could you send me some pictures of how your vac tanks hooked up I'm not sure that this one is quite right hasn't never run really right was thinking of just bypassing it to see if it would run differently. Have a merry Christmas and a happy new year hope to hear from you soon. Jason
Jason 10/D4,
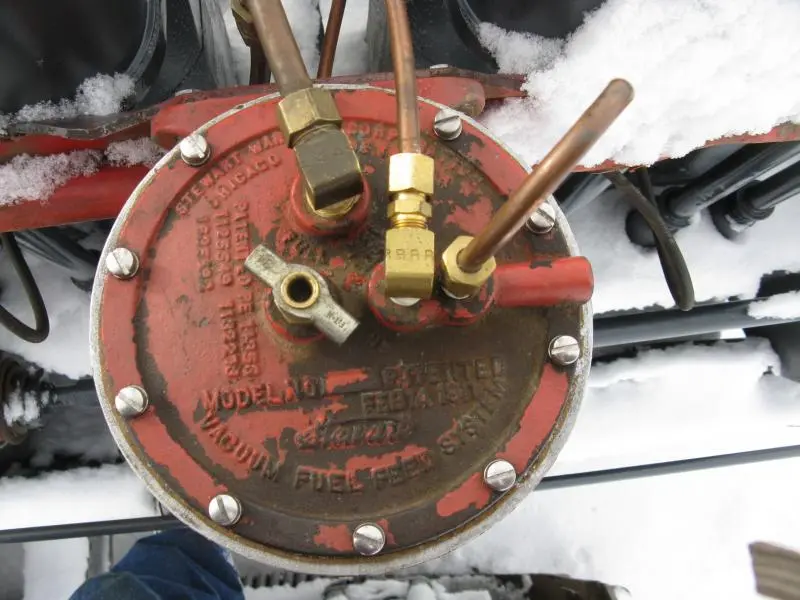
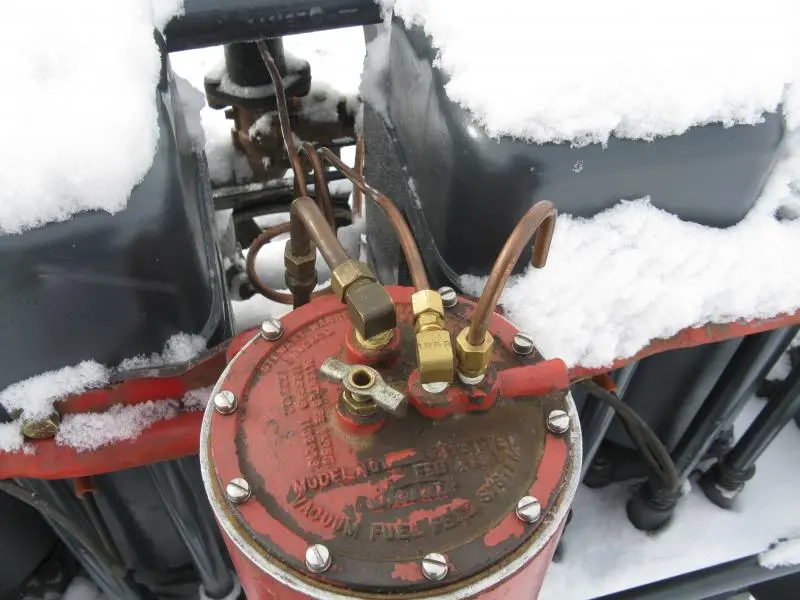
Sorry for the slow response. Here are some pictures of the fuel line arrangment. I'll try to explain what they are, etc.
The top one. That port on the Vac tank is labeled "fuel line". That would be the fuel line from the tank.
The one in the middle slightly to the right is labeled "vacuum line". That line goes to the intake manifold.
The far right port is the vent port and I cannot remeber if it is labeled on the tank or not.
The far left port is just a fill port. This port is used to do an initial fill of the vac tank if it is empty for some reason. This just needs to be plugged. This tank has a pet cock in that port which was handy for troubleshooting.
Please let me know if you need anything else or if I can help in any way!
Take care and I hope this finds everyone well!
[attachment=15805]vac tank arrangment 001.jpg[/attachment][attachment=15806]vac tank arrangment 002.jpg[/attachment]
Here is a scan of the article by Sid Shoemaker in Issue 19, April, 1996 of the ACNOC newsletter. It has some good information and a reprint of a SW manual page for one of the tanks.
(This from back in the days when our newsletter had some useful content).


Our channel highlights machines from the earliest Holt and Best track-type tractors, equipment from the start of Caterpillar in 1925, up to units built in the mid-1960s.
Chapter Two
| Newby Hall, Ripon, Noth Yorkshire, HG4 5AJChapter Two
| Freshfield Farm, Sloop Lane, Scaynes Hill RH17 7NP UKChapter Two
| Avalanche adventure, Welford Rd, Sibbertoft LE16 9UJ, UKChapter Two
| Highacres Farm, Dewey Lane, Brackenfield, Derbyshire DE55 6DB, UK
Antique Caterpillar
Machinery Owners Club
1115 Madison St NE # 1117
Salem, OR 97301
Terms & Privacy
Website developed by
AdCo
"I also joined a year ago. had been on here a couple of times as a non-member and found the info very helpful so I got a one year subscription (not very expensive at all) to try it out. I really like all the resources on here so I just got a three year. I think its a very small price for what you can get out of this site."
-Jason N
